When I posted
this pillow in January, a couple of people mentioned they were interested in a tutorial. Since the paint is drying in my sewing room and I'm officially unable to sew, that gives me time to put the tutorial together for you.
The official name of this block is the Sunrise star and it's a pretty traditional block. I didn't design this myself so I don't know if there are any issues with me posting this. If you know of any let me know and I'll remove it! Like I said, this a a pretty traditional block that I learned doing my first quilt. What's cool about it is the way those little "sunrays" get into the block. It's way easier than it looks. The actual block will be 12.5 inches square. I added the green border to fit the pillow I was using.
First select your fabrics.
You'll need:
A light fabric - I used Kona Ash.
a medium - I used the light blue floral.
a dark - the eyedrop fabric was what I chose. You can use all the same color or break it into different colors like I did.
Then you need your center fabric. This can be whatever value you prefer.
The first thing I did was to fussy cut the center block. You need a 5 1/2 inch square.
From your dark fabric cut (4) 2 inch squares.
Draw a diagonal line on the back of the 2 inch squares
Place the squares on the corners of your fussy cut piece with right sides together and sew over the lines that you drew.
Cut the excess fabric so you have 1/4 inch seams.
Press the corners out and you will have a block that looks like this. Set it aside for now.
Also from your dark fabric (or coordinating dark fabric if you are using 2 colors) cut a 3 1/4 inch square and then slice it in half diagonally both ways so you have quarter square triangles.
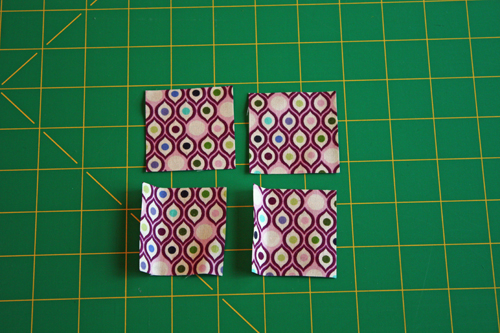
Take your light fabric and cut (4) 4" squares. Set aside for now.
Also cut a 6 1/4" square and cut it diagonally both ways for quarter square triangles.
Using your medium fabric, cut (4) 4 3/8" squares.
Cut them in half.
On the long side of the triangle, measure to 4 3/8" and cut the tip off.
Line up the light triangle to this shape and sew them together. Press towards the cut off triangle. Make 4 of these.
Line up your dark with the cut off shape so that it creates a triangle. There will be some overhang from the dark fabric. Sew them together, press towards the cut off shape. Make another 4 of these units.
This is what your two finished pieces should look like.
Put them together this way and sew. You'll have 4 of these units.
On two of those pieces sew the light squares on each side. You will have two of the above piece and two of the bottom piece.
Attach the two small pieces to the center piece so it looks like this.
Attach your pieces with the gray squares and you have your finished block!
Add a border if needed to fit your pillow and finish the back as you like. I didn't take photos if it this time, but I did an envelope closure. I did directions on this type of back on
this post. Hope you like it!


5 comments:
Great tutorial Becky! Extremely easy to understand and follow. Thanks!
Tracee
I LOVE this! Thank you so much for sharing! I'm going to try it! :D
Very cool! Thanks! I'll have to try this one.
It's a beautiful square. Thanks for the tutorial!
Becky!! I just made this block, and I am in love! I'll take a pic tomorrow. Thanks for the tutorial!
Post a Comment