Wednesday, February 27, 2013

My month for Make it Modern

I've been showing the blocks I have made for the Make it Modern bee the past few months. March is my month and I always struggle coming up with a block. I tend to prefer blocks that create an all over design rather than a sampler or individual block feel. So I really racked my brain on this one.

The MQG has a great tutorial here for Half Rectangle Triangles (HRT's) and I started thinking about different layouts since I have an obsession with diamonds lately. I came up with this one and am going to have my girls in the bee tackle it for me.  (and now that I look back at the tutorial, this is exactly the sample they show at the bottom- haha! So much for originality.)

So ladies, here are the details. My 4 year old daughter has requested a purple quilt of me and I'm hoping this works and I can make this for her. The colors are obviously purple and gray. Please make the purple a darker value than the gray. My first attempt at this was a bust because the gray was to too dark and you couldn't really see the design. I'm good if some pink sneaks in there as that is her 2nd favorite color and her bedroom has a lot of pink in it. Here's her current quilt to give you an idea of the shade. And here are the purples I started with.


Here is what your final block will look like:

If at any time my tutorial is confusing, feel free to ask question or go back to the MQG tutorial.  First select your fabrics and cut 4 gray 5"x7" rectangles and 4 purple 5"x7" rectangles.


Ignore the grays in this photo! This was from my first attempt and the dark gray was too dark and not distinguishable from the purple. You need 4 rectangles of light gray and 4 rectangles of purple.

Flip over two of your gray rectangles and draw diagonal lines across them in the opposite directions like below. Then repeat with your other two rectangles. (you will have two going one way and two going the opposite way)


Position them right sides together on top of your purple fabrics like below and pin as you like.


Sew 1/4" from each side of the line like you would with an HST for all 4 sets of rectangles.


Then cut on the line. Each set will give you two of the same set. The two pictured above will result in these 4. You will have 8 total.


Square them up to 4.5" x 6.5". Here's how I did it. The diagonal line went where the 4.5 and 6.5 lines are on the ruler. I took photos of this step because it was a head scratcher for me.


The other block gets measured vertically.


After it's all squared up (is it squared up if it's a rectangle??) lay them out so you have this and sew them all together.

ETA  Bee member Jamie  figured out how to deal with the fact the points on the top of the diamond have a seam allowance that is bigger than the points on the side of the diamond. Here are her directions:

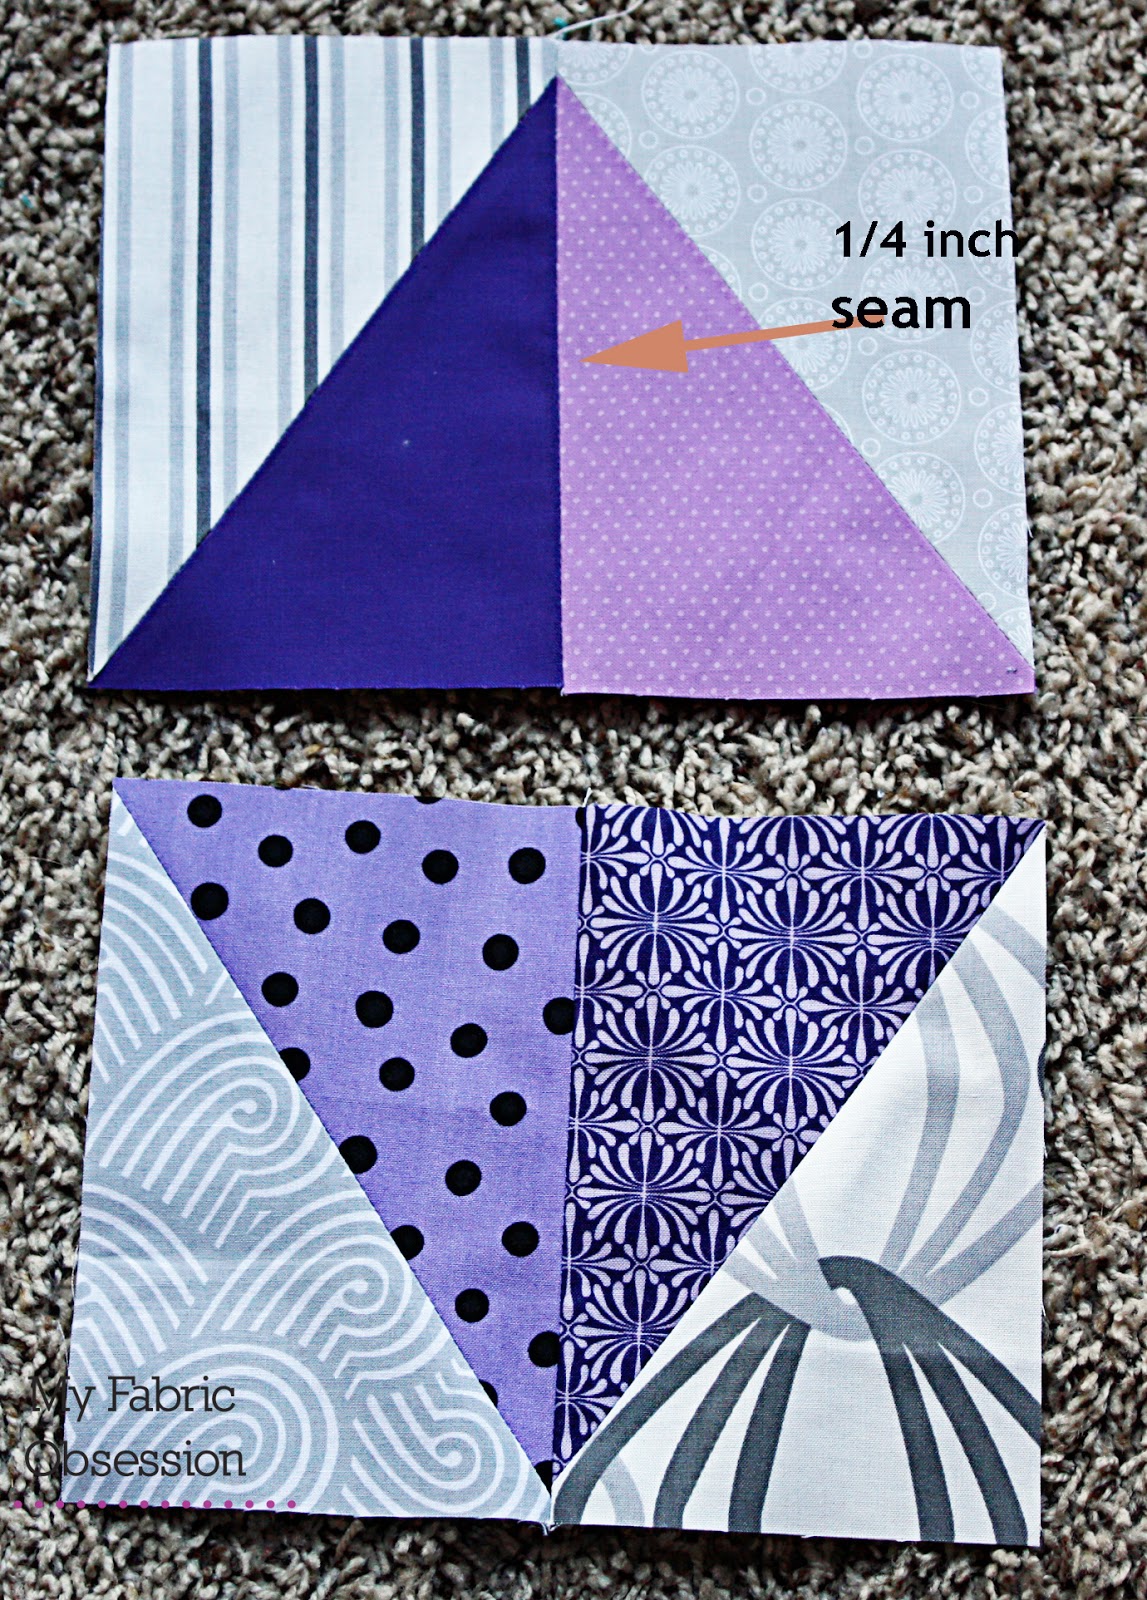
When sewing your diamonds together, sew the top half’s two pieces together using a 1/4 inch seam allowance, and sew the bottom half’s two pieces together using a 1/4 inch seam allowance. Then, when sewing the top half to the bottom half, use between a 3/8 and 1/2 inch seam allowance. If you usually use more of a scant 1/4 inch seam allowance, use 1/2 inch. If your seam allowance is exactly a 1/4 inch, use a 3/8 seam allowance. Everyone’s 1/4 inch is a little different, so just size accordingly. Hopefully this makes sense! Now your diamond will have about a 3/8-1/2 inch seam allowance on top and bottom, and 1/4 inch seam allowances on both sides.

If you are more visual like me here are some photos to help illustrate:


Huge thanks to Jamie for figuring that out!

Don't sweat it if your points aren't perfect. Just so they aren't massively off! ;)  If you zoom into my photo you can see my points aren't perfect either. Hope you enjoy this one. Let me know if you have any questions!!


Sunday, February 24, 2013

Happenings in my world

Well, I wish I could say I am at Quiltcon, but I'm far from it. Interviewing for a new job has been top on my list. But that doesn't mean there hasn't been any sewing going on. I'm binding up an almost finish....


I received some great blocks for the 4x5 bee. I'm just waiting on one to arrive.
From the top #1 is mine, 2: Suzy 3:Lindsey, 4: Cathy, 5: Wendy

I spent a great day sewing with some PMQG buddies. Well, I didn't do any sewing, but I got a hand quilting lesson and did some cutting and cutting and cutting.


I got some crochet lessons from my mother in law and she gave me this little booklet circa 1959. Makes me feel like Betty Draper (without all the gorgeousness! haha!).


And I'm working on this quilt.


and this quilt.


And Tuesday is the next PMQG meeting - YAY!


Tuesday, February 19, 2013

February Bee Blocks

My bee blocks for this month....

do.Good Stitches was Deb's month and we used the Picnic Quilt pattern found here to make scrappy blocks.


 First up for the Make it Modern Bee was Kelleigh. She is putting together a solids sampler for charity and asked for any 12.5" block. My block was from the Quiltmakers 100 blocks magazine and designed by Carolina Patchworks.


Then Renae wanted improv blocks based on Oh Fransson!'s tutorials. Because I'm terrible at improv, my block is almost exactly like the example only different colors. haha!


And next month I get to be queen in that bee, so I'm busy working out what I want to ask for. yay!


Friday, February 15, 2013

A Tova Top

I finally jumped on the Tova bandwagon and got the digital pattern. One thing I wasn't prepared for was the work involved prepping a digital pattern. I should have taken a photo, but I didn't get a chance. Just to put the pattern together is 26 pages printed out and taped together. It's a bit of a process. Just the paper taping took me one Umi Zoomi Episode. For those of you without little ones, that is 24 minutes. But sometimes you gotta do it - you know, since the paper pattern is sold out.

I decided to make mine out of Kona cotton instead of muslin since I had a coupon that made it basically as cheap as muslin. And I recommend checking out this sew along at Very Kerry Berry. She's got lots of great tips to help make the process easier. And she talks about different modifications. I wanted to do the long sleeves she mentioned, but forgot when I cut the pattern. Slick right?

Anyway, here is my final shirt (ignore the faces, I haven't gotten the hang of self portraits!).

It's pretty good. I definitely want to make another one in voile. The 100% cotton is a little stiff for my liking and feels a bit like a maternity shirt. Maybe that's just me?  Anyway, I think the voile would be a lot more flattering. And maybe this will soften after a few washes?

The one thing I did have issues with is the neckline. Remember when I posted about my needle breaking? I was working on this top at the time and it turns out that I had a pin in my way. When you pin the tow plackets together in one direction, then you sew the other direction and you can't see the pins beneath it. Yeah, that's when I sewed over my pin. I didn't realize when I pulled out the pins that the placket shifted. You can see the result in this close up. It's the part at the bottom of the open neckline.


Totally not worth fixing, but worth noting for the next one!


Monday, February 11, 2013

Something Machine Appliqued [Blog Hop]

Welcome the last stop of the Something New Sampler Hop! That's right, I'm the caboose! Woot woot!

Amy from the Cute Life asked me if I'd like to try something new this year and share it with you all. After some thought, I decided on machine applique. I have to admit, this wasn't totally new to me. I had tried and failed in the past. So I wanted to tackle it again. My friend Denise gave me the courage to try again and helped me iron out the kinks. Big thanks to her for the help. Sometimes you just need someone to hold your hand. Hopefully this will be that for you! This was my first project to use my new skill and it was fun to put this little tutorial together for you.

There are a million ways to do applique, this is just what I do (correct or incorrect). My block is a take on scallop quilts. Here is the link for how to make the clamshell shape. You will need to make 9 clamshells for this block. I made my clamshells with a 4" square. Thanks to Amy, here is a template you can download.

I'm not going to go into detail on prepping the piece for sewing since there are also a million ways to do this. I used a plastic, iron resistant template and starch to turn my edges. Another favorite method is freezer paper - google it and you'll get lots of great tutorials. When you make the scallop, you only need to turn the top rounded edge for all pieces except for the bottom since the other pieces will be sewn over. This will make more sense when you see the pictures.

One quick tip for when you are prepping your pieces. If you have a circle cut ruler it can really help cutting the piece.  Here you can see the marker line on my plastic template and then I cut on the 4" line above that.  You can just freehand it since you'll be folding that under, but the circle template makes it much easier if you have one.


So, on to your supplies. I used a mono-filiment thread in clear that I got at my LQS.

This comes in a smoke color too if you are using dark colors.


Or you can just use a thread color that matches your fabric choice.

Next is your settings on your machine. You should get some practice fabrics to test out the right settings. I found that I need to use the mono-filiment in the bobbin as well as the top or I could NOT get a good tension going. (Be aware when winding your bobbin - the mono-filiment can get hot if spun too fast around pegs on the top of the machine).

I used stitch #27 below. Find the similar stitch on your machine. You want the machine to stitch 3 or 4 times in a straight line, then take a notch to the left. On some machines you might have a stitch like this that goes to the right and be able to reverse it. My machine is not that fancy.

Then you should bump up your width and stitch length a bit. You can see below that I did 2 notches  on both of them and that I have my machine on 1/2 speed. I have a lead food and this isn't the time for that!


Once you find your settings, I recommend putting a note on your machine so if you have to come back to it later you'll know where you were.


Okay - that was the time consuming part. The rest is easy peasy, I promise!

First we need to lay everything out as we want it to be finished. This is what our finished block  will look like.


Pin the top scallop down and remove the rest. I'm not a big pinner so I didn't use a lot. Please use what you are comfortable with. And only pin the top scallop (unlike my photo above).


At the machine, make sure all your settings are correct. We are going to sew around the top edge only. The straight line stitches will be outside the scallop like this:


Then the little hop to the left will catch your scallop like this:


Can you see your stitches? They should look something like this (if you can see them!)


Stitch across the entire top only. Don't worry about the bottom portions. We'll lay out the next scallops and they will cover that up! Pin them and sew.


Sew across those two and repeat each row until finished. Then it's time to trim to  7.5" by 14.5".


And you have your finished block!


I had a hard time photographing the stitches so you could see them. They are so hard to see and so hard to photograph. In my opinion, that's what you want! Look, you can see the dirt on my fabric, but not the stitches! HAHA!


Hope you found this tutorial helpful. Some of the steps were hard to describe so please ask if you have any questions! And don't forget that Amy's going to have prizes on her site at the end so link up your finished tops there!


Wednesday, February 6, 2013

Doll Quilt Sent

Now that my Doll Quilt has been received I feel better about posting it. If you follow me on Flickr you may have seen sneaks of this one since it's for the DQS13 swap. My partner was Louise (aka Lululollylegs) and her favorites seemed very different from my usual style. She did have embroidery on her favorites and low volume quilts. I ran with those and this was my result. The final size of this is about 19" by 19".


Can you see why I didn't post about it sooner?


I think that would have given it away huh? I got the embroidery pattern from Urban Threads (Love them!).


The fabrics were a bunch of fat quarters from my LQS Sew Smart Fabrics so I don't know all the names of them.


I used my regular label and wrote all the information on it. It was a little too close to the year change for me and I wrote 2012 on it first! ARGH! I had already basted the thing so I was stuck and just wrote 2013 over it. Hopefully she doesn't mind too much.


This was my first time participating in this swap and I didn't realize so many people did special things with the backs of these mini's too. Next time I will know. I've been blown away by the creativity in this group and I hope to sign up for the next round. Hope you like it partner!


Oh, and I did include some Denise Schmidt fabrics as an extra goody, but forgot to take a  picture of that.


LinkWithin

Related Posts Plugin for WordPress, Blogger...