Showing posts with label pillow. Show all posts

Wednesday, December 27, 2017

A special music quilt

Back in 2013, I made a nautical quilt, stocking and two pillows for a woman having her first baby. I couldn't help her with her 2nd baby due to machine troubles. She's now having her 3rd baby and asked me to make a music quilt set for this baby in blues and greens! I finished this quilt earlier in the month, but held off on the post since the baby is due around New Years!

This quilt is my own design inspired by some photos the mom sent me.


I used my Silhouette to cut these applique pieces. However, my Silhouette is super old (maybe 10 years) and was never meant to cut fabric. It kind of stopped working mid-way through this keyboard and I wound up doing a lot of it by hand.


The rest of the shapes worked well, but I do think it might be time to retire the Silhouette until I can replace it with a new model.


I considered putting a cassette tap on here as well, but I figured the record would be enough explaining for mom and dad! Haha!


My favorite part of this quilt I think is the music striped binding!


This is the first quilt that I forgot to put my label on the back! I realized it after I had sewed the binding on, however, I had packed up my sewing room for Christmas and couldn't even sew a label together to hand sew on there!


Along with the quilt, I made a matching stocking. I used Amanda Murphy's Modern Holiday  book for the pattern. The name is hand stitched by transferring the name on the cream fabric and stitching on top of that.


She also asked for 2 pillows. I made one that links to the quilt with this little guitar.


The other links to the stocking which of course they both use quilt fabrics!

I hope the whole family loves these and that baby boy Ryan arrives safe and sound! What a wonderful new years gift.


Sunday, June 23, 2013

Nautical Quilt - take 2

Many of you will remember this nautical quilt that I made for my sister. She has it posted on Project Nursery right here. Through that site a lovely woman contacted me and asked me to make one for her coming baby girl. Unfortunately, that quilt is made with Neptune, which is of course hard to find. I have some, but not enough to duplicate it. Fortunately, Tula Pink designed Salt Water recently. It has the same feel so I started with that as my main focus. I'm really happy with the results!


I did a bunch of customization for her. The boat flags are a Polish and American flag for the parents and I hand embroidered the baby's name on it.


I used an off white for the background for more durability for a baby quilt and since Salt Water has a a bit of off white throughout it.


The quilting I did the same way as my sisters.


She wanted to hang the quilt initially so I added corner pockets so a dowel rod could be inserted. I'm hoping it works well, I've never used this method on such a big quilt.


The binding I pulled from Prince Charming. It went so well I couldn't resist.


She also asked me to make her two coordinating pillow covers. I made one sailboat like the ones on the quilt.


The other I made an anchor with some patchwork.


I hope she's as happy with everything as I am! I can't wait to see what she does with the rest of her nursery.

 
Quilt stats:
Quilt name: Nautical Baby
Fabrics: Tula Pink's Salt Water and Prince Charming
Finished size: 46"x57
Finished: 5/20/13


Thursday, March 3, 2011

Parisville pillow saved

If you remember this post, I was having problems with this pillow. Nothing was lining up properly and I was getting puckers. I decided to keep going with it and quilt as recommended in the book (Dare to be Square).
I'm glad I did. It's still not my favorite pillow, but at least it not a total mess. I don't think these prints lend themselves well to such a geometric pillow. I'm wishing I had done my cathedral windows project for this one.

It's a pretty puffy pillow so  a lot of the puckering is masked. Especially since the quilting itself created some puckering. whoops! I haven't washed it yet. I'm not sure if I'm going to or not, but that would probably help even more.
This was the first pillow I added piping too and I really like the effect.  I used leftover binding from my king quilt to cover cording and attach it. It was pretty simple, if I do it again I'll take photos.

 The back is a simple envelope closure that I did a fancy stitch on the hemline.
I know I wouldn't be good with an embroidery machine. I get so bored waiting for these special stitches! 

I'm waiting for the sun to come out so I can take some pictures of this on the bed. Yay!

Sunday, February 27, 2011

Painting and Pillow Fail

Let me start this post by saying I'm totally frustrated at the moment.  I mentioned before that I was going to paint my dining/sewing room before all the big furniture comes back. {btw - if anyone has a good way for me to convince hubby to scrap the dining room furniture and just make this my sewing room, I'm all ears}

Our new house is over 40 years old. The room I'm in is unfortunately paneled and painted over. We have baseboard heating. I never knew that leads to dirty walls, but it does. Kinda looks like this over time.
 And this.

And yes, the brass outlet covers are going too.

 So back to my paint job. I selected a white with gray tinge because I loved a similar color that I did in our bedroom. Unfortunately it wasn't gray tinge, it was blue. The walls looked the color of wet cement. blech.  AND - I wasn't thinking and the downstairs of our house is all done in warm peachy neutrals. It's a very open floor plan so the blue was not cutting it. I went back for decorator white and here's the process of repainting. (sorry for the blown out window, it was the only way to show the blue wall)

So that was done but the trim still needed a 2nd coat of white. And the walls might too. I can't decided if I'm fixated and just seeing the blue because I'm looking for it. Or if I can really see it. Either way, I'm so annoyed that a 2/3 day job has stretched to 5.

If you are still with me - thanks! I'm done ranting. About painting. Here's what I need help with.

I've been sneaking in work on this pillow even though the sewing room is mostly packed up and I'm totally frustrated. This pattern is from the book Dare to Be Square by Boo Davis. I love this book, it's got some great patterns in it. And I think what's happening is totally my fault but I can't figure it out!
Here's the top in question. The blocks are assembled in rows from top to bottom. My problem is that nothing is lining up. The lines of blocks with the printed fabric were 1/2 inch longer than the solid blocks that run in between it.  I can't figure out why. I re-measured. I cut another set and put them together again with the same results. But I found someone on flickr who made it and had no problems. So it must be something I'm doing. Maybe my seams aren't a perfect 1/4 inch?
I finally got frustrated and just stretched it to fit. As you can see, the results are less than stellar. Above you can see how uneven my edges are. Below is a close up of the hot mess.
It's stretched, it's puckered and it's annoying the heck out of me. It still needs a border and a backing but I'm ready to just toss it and move on.

Have you had this happen? What did you do?  Do you think it can be saved with some creative quilting? I usually don't quilt my pillow tops, but maybe some quilting and a washing will hide this? Help!

Friday, February 25, 2011

Tutorial: Sunrise Star Pillow

When I posted this pillow in January, a couple of people mentioned they were interested in a tutorial. Since the paint is drying in my sewing room and I'm officially unable to sew, that gives me time to put the tutorial together for you.

The official name of this block is the Sunrise star and it's a pretty traditional block. I didn't design this myself so I don't know if there are any issues with me posting this. If you know of any let me know and I'll remove it!  Like I said, this a a pretty traditional block that I learned doing my first quilt. What's cool about it is the way those little "sunrays" get into the block. It's way easier than it looks. The actual block will be 12.5 inches square. I added the green border to fit the pillow I was using.

First select your fabrics.

You'll need:
A light fabric - I used Kona Ash.
a medium - I used the light blue floral.
a dark - the eyedrop fabric was what I chose. You can use all the same color or break it into different colors like I did.
Then you need your center fabric. This can be whatever value you prefer.

The first thing I did was to fussy cut the center block. You need a 5 1/2 inch square.


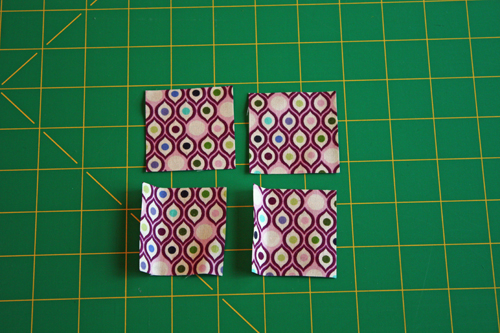
From your dark fabric cut (4) 2 inch squares.

 Draw a diagonal line on the back of the 2 inch squares
Place the squares on the corners of your fussy cut piece with right sides together and sew over the lines that you drew.
Cut the excess fabric so you have 1/4 inch seams.
Press the corners out and you will have a block that looks like this. Set it aside for now.

Also from your dark fabric (or coordinating dark fabric if you are using 2 colors) cut a 3 1/4 inch square and then slice it in half diagonally both ways so you have quarter square triangles.

 Take your light fabric and cut (4) 4" squares. Set aside for now.

Also cut a 6 1/4" square and cut it diagonally both ways for quarter square triangles.


 Using your medium fabric, cut (4) 4 3/8" squares.
Cut them in half.
On the long side of the triangle, measure to 4 3/8" and cut the tip off.

Line up the light triangle to this shape and sew them together. Press towards the cut off triangle. Make 4 of these.
Line up your dark with the cut off shape so that it creates a triangle. There will be some overhang from the dark fabric. Sew them together, press towards the cut off shape. Make another 4 of these units.
This is what your two finished pieces should look like.
Put them together this way and sew. You'll have 4 of these units.
 On two of those pieces sew the light squares on each side. You will have two of the above piece and two of the bottom piece.
Attach the two small pieces to the center piece so it looks like this.
Attach your pieces with the gray squares and you have your finished block!
Add a border if needed to fit your pillow and finish the back as you like.  I didn't take photos if it this time, but I did an envelope closure. I did directions on this type of back  on this post. Hope you like it!

LinkWithin

Related Posts Plugin for WordPress, Blogger...