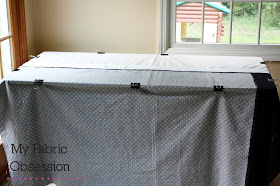
First of all, you need the right surface. I have no floors in my house that will work (everything is hardwood or carpet) except the kitchen. And since I tend to baste over a few days, leaving a quilt on the floor in the kitchen is not an option. We happen to have just the right card table which is sturdy and has a hard surface. I've heard people like to use their kitchen island (which is a great height) but again, I can't leave my quilt there for a few days!
The first thing to do with your work space is divide it into 4 quadrants. I used cording that I had on hand. You could use anything that is going to be thick enough to feel through the quilt. Extension cords, anything you have on hand. Secure it down. It doesn't have to be the exact centers of your table, you'll see why in the next step.
Fold your quilt backing into quadrants and finger press it. Meaning fold it in half one way, then in half the other way. That way you have fold marks that also divide your quilt back into quadrants. Do the same for your batting and backing.
Starting with your backing, lay it right side down on the table and line up your folds with your cording. You can see the arrows are pointing to where you can actually see my cording through the fabric. Usually you will just feel for this which is why it's important for your cording to be thick enough.
After all the lines are matched to the cording, smooth everything out and clamp it down.
Add your next layer on top, the batting. I start by matching up one of the folds as the batting is still folded (like in the photo) and then unfold it and match the other fold.
Smooth everything out and clamp again. Some people don't clamp this layer since it's not likely to shift. Since I have two small children all layers get clamped!!
Repeat those steps for your quilt top. At this point, take the time to walk around your quilt and double check that all the edges hanging over are lining up correctly. You don't want to spend time pinning just to find out there isn't enough backing on one side.
Gather your supplies and start pinning! I didn't know how to photograph the last steps but it's pretty simple. Once you have pinned the surface as you like you can undo your clamps and shift the whole quilt. Re-clamp it making sure all layers are smooth and keep pinning until the whole quilt is basted.
Hope this is helpful! If you have any tips to share, I'd love to hear them. How do you baste your quilts?


Thank you for sharing! What a great idea to get the centres lined up!
ReplyDeleteI absolutely adore the quilt! Can't wait to see it finished!
I've done this on the floor before, but never get it taught enough. Maybe on a table so I'm more comfortable and can take the time to get it right will help.
ReplyDeleteWhat is the kwik klip tool for?
I love the idea of putting the cording down! I usually just measure to the exact center, this could be a real time-saver :)
ReplyDeleteBecky - thanks so much for this... I have an all carpeted house and I never thought to do this... I think I may get a fold up table for basting... this is fantastic!!!
ReplyDeletenydia@add-crafter.com
I use this method and it works great! I'm on the hunt for a used fold up ping pong table to use this method with because it will give such a nice big space, but I'm afraid all the used ones have been scavaged up for beer pong:/ And new ones are expensive!
ReplyDeleteExcellent tutorial!
ReplyDeleteI'm a guilt-ridden spray baster. I hate that it's chemicals and I hate that it's spray. But it's so fast!
ReplyDeleteI usually save my basting for when I'm on a retreat because there are large tables set up on bed risers so they're the perfect size and height.
I LOVE the idea of using the cording to line the quilt up! I usually use a seam in the backing and match it to the top, or use tape to mark the centre. I like your way better! Thanks for sharing!
I use the same method, but I use a craft table for it so I keep a permanent plus sign made from toothpicks taped in the center of the table. It's super easy to feel any time I need to find the center of the table to line up and baste a quilt.
ReplyDeleteAwesome! I love the binder clips. I use painters tape and HATE it! Thanks so much!
ReplyDeleteI've never seen this method of basting before. What a clever way to do it! Thanks for sharing.
ReplyDelete