Friday, October 26, 2012

Bloggers Quilt Festival Houndstooth Quilt

Amy's Creative Side


It's that time of year again! Blogger's Quilt Festival hosted by AmysCreativeSide.com. If you haven't been there yet, go check it out. It's a virtual quilt show and there area always so many beautiful things to see. Those of you who are new here, thanks for stopping by! You can see all of my finished projects by clicking the finished project links above.

This fall I'm featuring a quilt I've already shown. It's definitely my favorite quilt that I've made since the last Quilt Festival. The Houndstooth quilt!


This quilt was originally part of the Sew Sweetness Tula Pink Sew Along. I did a pattern review and you can see that post right here.

Just in case you can't tell, those houndstooth blocks are really large! Here is a  photo I took so you can see how big they are. The square within is 6" big.


This yields a pretty big quilt (66"x72")! It would definitely be a large twin and could possibly even fit a double.


I quilted this one myself with alternating straight lines on the diagonal to create texture.


I wish this quilt still lived with me, but it was a gift for my sister and now resides on her couch. At least I can visit it!

Quilt stats:
Size66"x72" 
Pattern: Houndstooth by Tula Pink
Fabrics: Woodgrain from Joel Dewberry, Michael Miller Cotton Couture Venus, Kona white and I can't remember the dot fabric
Quilted by: Myself
Finished: 9/14/12
Best categories: Bed Quilt and Home Machine quilt


Monday, October 8, 2012

A Major Pinterest Win for me

Did you see this Pin going around?

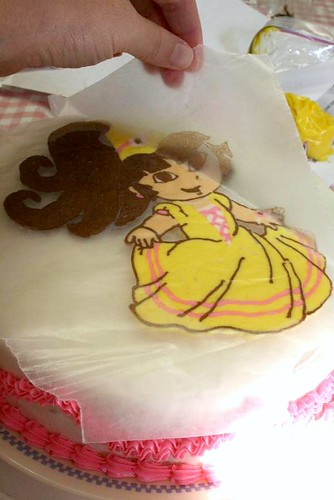
The link is here, at the genius Moey's Heart and Hearth. This is an amazing tutorial on how to decorate a cake with a character. I think this has to be the BEST thing I've ever found on Pinterest.

My four year old wanted a Dora cake (coincidentally). So I followed the tutorial and here are my results:

The Dora turned out so good people couldn't believe I made it. Now I just need to figure out how to make my handwriting better!

And in quick Pinterest recipe news... these two recipes were really good. I served them together tonight:

Tomato Basil Soup

And Butternut Squash Mac N Cheese


Wednesday, October 3, 2012

Pretty Little Pouch Received

I received my Pretty Little Pouch swap  earlier this week and I was so excited by everything I received. First off, it was fun because someone I "know" from the Flickr world got me. I think that's the first time I've had someone known in a swap. Mary of Fairly Merry was our fearless leader in the Sew Modern Bee and she put together this beautiful package for me.


I had requested a boxy bag for a make up case, preferably in something easy to clean. She made this pretty bag out of oilcloth. It's perfect!


Then she made this adorable little pouch - Tula Pink anyone? :)   the best part is the other side...


Love that embroidery detail! The inside has little pockets and everything. So cute!


And apparently she was a little late in sending it so she added lots of other little goodies. Chocolates not pictured because they are already hidden!!


How cute are those sewing machine buttons!?

Thank you so much Mary for a wonderful package!!! I'm still a bit nervous about this swap though. I haven't heard anything from my partner which I made this for. At this point, I'm worried about her as much as the pouch. Hoping she's okay and that the pouch has arrived.


Friday, September 28, 2012

Quilt Finish: Houndstooth

You may have already seen this quilt top yesterday during the Sew Sweetness Tula Pink Sew Along. You can go here to see my full review of the pattern. A little bit of my original review got cut off. All it really said though is that Tula Pink rocks and her book is amazing. I absolutely recommend it!

So this is finally quilted and bound and I couldn't wait to show the final product here.


I struggled with how to quilt this (as usual). It's pretty large at 66"x72" (I showed a size reference on the other post) and therefore is bulky under my standard machine for custom quilting. So I decided to play off the way that Angela Walters quilted Tula Pinks version in her book. She did straight lines in the dark herringbones and then a wavy design in the light ones. I took that straight line and extended it through the quilt and spaced it out so it made more of a texture. You can see it more on this photo (apparently bright sunlight is good for showing texture!). I'm really happy with how this turned out and will probably do this again.


I totally miscalculated the fabric I needed for the front and wound up with a lot of extra. It worked out well for the back!


Close up of the fabrics and my labels. I also struggled with the thread choice because I had such contrasting colors. I wound up meeting in the middle and using a soft grey from Essentials Thread (silver, 50 wt). I'm really happy with how it turned out. And my machine was very happy with the thread. I had zero tension issues with this one which is rare for me.


One of the things I didn't talk about in my other post is the fabrics. Specifically that purple solid. My sister (who now owns this quilt) had a specific purple in her living room with the yellow and grey. She sent me a photo and I searched for just the right purple. I finally found it in Cotton Couture Venus. This was the first time I've worked with Cotton Couture (which is from Michael Miller) and I just have to rave about it. It is so soft and fabulous to the touch. It's almost reminded me of voile! But definitely not see-through. I had to be careful with it so it didn't pucker since it was softer/lighter(?) than the other fabrics) but once I got used to it, it was fantastic. I even did the binding with it. I can definitely see myself getting more of this to use for shirts.


I really love this quilt, but it's going to live with my sister in Florida. Guess I'll just have to make another one right??

Quilt stats:
Size66"x72" 
Pattern: Houndstooth by Tula Pink
Fabrics: Woodgrain from Joel Dewberry, Michael Miller Cotton Couture Venus, Kona white and I can't remember the dot fabric! 
Quilted by: Myself
Finished: 9/14/12


Thursday, September 27, 2012

My stop on the Tula Pink Sew Along

I am so thrilled to be part of Sara's Tula Pink Sew Along. You all know my addiction for Tula Pink and her fabrics (just search my blog for Tula Pink and you can see my many projects!). So when Sara asked me to do a pattern review I jumped at the chance. Today is my stop on the blog so check it out right here.

More information on the Sew Along  and how you can participate:


Here is the schedule of guest posts that will appear:

Sept 24 - Sara @ Sew Sweetness (Dream Weaver/book)
Sept 25 - Katie @ Katie's Korner (Beanstalks/book)
Sept 26 - Lisa @ That Crazy Quilty Girl (Cloudy Day/book)
Sept 27 - Becky @ My Fabric Obsession (Houndstooth/book)<----you are here! 
Sept 28 - Caitlin at I Don't Do Dishes (Spiked Punch)

Oct 1 - Amanda @ A Crafty Fox (Alphabet)
Oct 2 - Michelle @ City House Studio (Fade to Pink)
Oct 3 - Marci @ Marci Girl Designs (Le Petite Salon)
Oct 4 - Katie @ There and Back (Field Study)
Oct 5 - Lorelei @ Mermaid Sews (Hushabye)

Oct 8 - Anorina @ Samelia's Mum (Pancakes)
Oct 9 - Jenna @ Sew Happy Geek (LOVE)
Oct 10 - Lindsey @ LR Stitched (Fairy Tale Lane/book)
Oct 11 - DeeDee @ mybricole (Any Which Way/book)
              Beth @ Plum and June (Cartwheels)
Oct 12 - Katy @ The Littlest Thistle (Crown Jewels)

Oct 15 - Colleen @ The Busy Bean (Shattered Glass/book)
Oct 16 - Kristen @ KD-Quilts (Stacks/book)
Oct 17 - Roseann @ Rosebud's Cottage (Shattered Glass/book)
Oct 18 - Emily @ Mommy's Naptime (Lollipops/book)
Oct 19 - Jeannette @ Gone Aussie Quilting (Honey Honey)

Oct 22 - Brenda @ Pink Castle Fabrics (Windswept)
Oct 23 - Bianca @ Sweet Diesel Designs (Stacks/book)
Oct 24 - Jessica @ Sew Crafty Jess (Snow Globes)
Oct 25 - Elizabeth @ Don't Call Me Betsy (Space Dust)
              Lindsay @ Lindsay Sews and Craft Buds (Cherry Pie)
Oct 26 - Kim @ My Go-Go Life (Kiss Kiss)
              Kim Munoz (Grand Salon/book)


You also have your own opportunity to make a Tula quilt, bag, dress, whatever! You have until Monday, November 12, 2012 to make something and be eligible for some outstanding prizes!! Here are the rules to be eligible for entry into the contest:

1. Join the Tula Pink Sew Along Flickr Group.

2. To be counted for entry into the contest, get sewing!! Sewn item must be made from a Tula Pink pattern (or from her book) *OR* made from at least 50% Tula Pink fabric (such as a bag, dress, etc.). If you are sewing from a Tula Pink pattern, the fabric does not need to be Tula Pink fabric.

3. If you will be adding an item to the pool to be counted as an entry, it must be sewn and photographed from September 24th through November 12th, 2012. Any items completed before September 24th are not eligible.

4. You may add up to 2 photographs per item.

5. You may add as many items as you want, as long as you made them each within the time frame. If you are making a quilt, the quilt top is adequate to be entered. Anything smaller (mug rug, mini quilt, bag, dress) should be completely finished.

Tula Pink Sew Along
Now how about some discounts?!?
Tula Pink has generously offered a 25% discount on all PDF quilt patterns when you use coupon code tulatroop in her pattern shop. This code is good now through October 31, 2012.
My lovely sponsor, Brenda from Pink Castle Fabrics, has generously extended a 15% discount on all Tula Pink fabrics in the shop using coupon code TULA15. This code will be good now through September 30th.
If you don't already have the book, Tula Pink's publisher is offering a discount code so you can pick up your own copy! Use code TULA2012 when you purchase the book from the Martha Pullen store. Support publishers and authors by buying direct!
Prizes

Prizes will be announced soon, but here's a little sneak peak at the sponsors that have offered up their amazing products as prizes!
                  
So let's get ready to sew!!! Join me and head on over to the Flickr Group and get ready for some amazing Tula Pink eye candy! I can't wait to see what you create!


Monday, September 24, 2012

Tutorial: Pin basting on a table

For a while now I have been a spray baster. Lately I've been having less than stellar results. I've been getting puckering on my backing that I'm just not happy with. I think the quilts I've been doing have just been too big. So I've gone back to pin basting and I figured I might as well put together a little tutorial on how I do it.

First of all, you need the right surface. I have no floors in my house that will work (everything is hardwood or carpet) except the kitchen. And since I tend to baste over a few days, leaving a quilt on the floor in the kitchen is not an option. We happen to have just the right card table which is sturdy and has a hard surface. I've heard people like to use their kitchen island (which is a great height) but again, I can't leave my quilt there for a few days!


The first thing to do with your work space is divide it into 4 quadrants. I used cording that I had on hand. You could use anything that is going to be thick enough to feel through the quilt. Extension cords, anything you have on hand. Secure it down. It doesn't have to be the exact centers of your table, you'll see why in the next step.


Fold your quilt backing into quadrants and finger press it. Meaning fold it in half one way, then in half the other way. That way you have fold marks that also divide your quilt back into quadrants. Do the same for your batting and backing.


Starting with your backing, lay it right side down on the table and line up your folds with your cording. You can see the arrows are pointing to where you can actually see my cording through the fabric. Usually you will just feel for this which is why it's important for your cording to be thick enough.


After all the lines are matched to the cording, smooth everything out and clamp it down.


Add your next layer on top, the batting. I start by matching up one of the folds as the batting is still folded (like in the photo) and then unfold it and match the other fold.


Smooth everything out and clamp again. Some people don't clamp this layer since it's not likely to shift. Since I have two small children all layers get clamped!!


Repeat those steps for your quilt top.  At this point, take the time to walk around your quilt and double check that all the edges hanging over are lining up correctly. You don't want to spend time pinning just to find out there isn't enough backing on one side.


Gather your supplies and start pinning! I didn't know how to photograph the last steps but it's pretty simple. Once you have pinned the surface as you like you can undo your clamps and shift the whole quilt. Re-clamp it making sure all layers are smooth and keep pinning until the whole quilt is basted.

Hope this is helpful! If you have any tips to share, I'd love to hear them. How do you baste your quilts?


Sunday, September 23, 2012

Another do.Good Stitches quilt

In June, I was leader of our group in do.Good Stitches again. I chose to use this tutorial and asked for green and blue fabrics. It's a great tutorial and I highly recommend it for using those strings you've got! The girls of the Bliss group delivered with some fantastic blocks.


I used Kona charcoal for the sashing to hopefully give it a masculine feel. And some leftover binding I had from my double wedding ring.


I had lots of leftover binding I from my double wedding ring and it matched perfectly with this quilt.


I did straight line quilting across the quilt to keep it simple but hopefully give all those bias edges some strength.


This is a pretty big quilt at 58"x 70". It will be heading to our groups charity Wrap Them in Love which distributes them to needy children.


Quilt stats:
Size: 58"x70"
Pattern: String block
Fabrics: Various from do.Good Stitches Blissgroup
Quilted by: Myself
Finished: 9/21/12


LinkWithin

Related Posts Plugin for WordPress, Blogger...